MAKING A TWISTED BOX
Introduction
This box requires careful preparatory marking-up and a steady hand, since you're turning more air than wood. At a small scale, the twist box is a fairly simple introduction to multi-axis work. If done on a large scale, it can make your lathe walk across the floor on its own. Not for the faint of heart. Turning experience and safety gear required.
This article covers turning the twist, not the details of turning the interior of the box or lid. The twisted finial is covered in "a twisted finial".
I was inspired by an article in the magazine "Woodturning", issue 208 (Christmas 2009), pp. 63 - 66. "Pair of three-sides candleholders" by Paul Nesbitt. I decided to try translating the technique he described for a three-sided twist into a four-sided box with a quarter-turn twist.
Woodworking is an inherently dangerous activity. The non-woodworking techniques described here aren't all that safe, either. Sharp tools, powerful motors, big lumps of wood, chemicals, fumes, etc. can cause you serious bodily injury or even death. These pages are NOT meant as a substitute for instruction by a qualified teacher, just as an illustration of how I do certain things. I take no responsibility for any mishaps you may experience during a fit of inspiration. You've been warned.
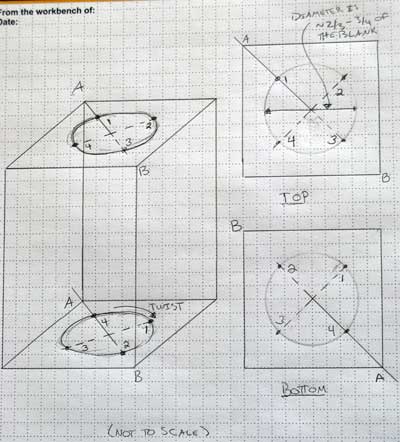
Photo 1
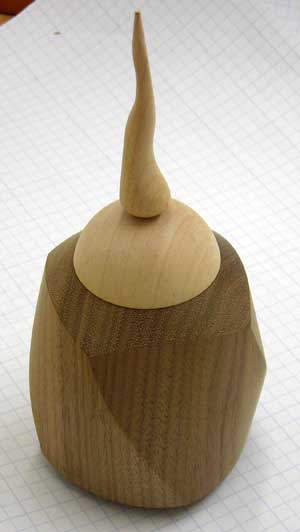
After reading the "Woodturning" article (see the Introduction page for the reference), the first thing I did was think about what I wanted to achieve and sketch out how I'd need
to mark my blank. I created a simple wireframe sketch of my blank and each end of it so I could visualize how the mounting points would match up.
Following the recommendations in the article, I used a compass to draw matching circles centered on the blank ends. All my mounting points will be on these circles.
Now the twist comes in. I've marked the mounting points on the circles on both ends of the blank. These are between 2/3 and 3/4 the width of the blank, to give room for mounting and cutting.
I want a twisted square, so I've marked four points on each end, equally spaced around the circles. Note the corner marked "A" on the diagram in the image above. The mounting points on the
TOP are labelled 1 through 4, sequentially. To get the labelling for the BOTTOM, imagine that I've turned the TOP circle 90 degrees and dropped the labels down onto the BOTTOM. In short,
the labels on the BOTTOM are off a quarter-turn from the labels on the TOP. This gives me the twist I want.
Note: in practice, I found that setting the circles' diameter to 2/3 of the blank width worked better for me than 3/4 of the blank width because I had more room for the drive and tail centers
to grab the blank without splitting as I turned away wood. This may differ for different species of wood.
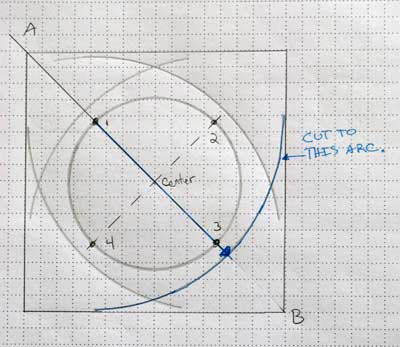
Photo 2
The article's author also recommends marking out cutting guidelines so all the sides match at the ends. I set my compass a bit larger than the diameter of the circle, placed the point in each of the labelled mounting points and drew an arc across the opposite side of the blank. These arcs should be set so the mounting points don't get turned away when you get down to the final shape. Losing a mounting point after spending a lot of time turning the twist is....really annoying.
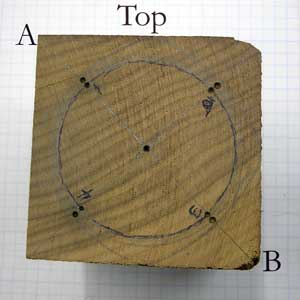
Photo 3
This is the top of a 3" square walnut blank, marked up as in the diagrams. The lines don't show up well in the photos, unfortunately. I've marked "A" and "B" corners of the blank so you can see how things shift when I turn the blank over in the next image.
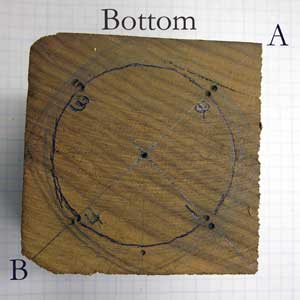
Photo 4
The bottom of my blank, marked up. Again, note the "A" and "B" corners are identified.
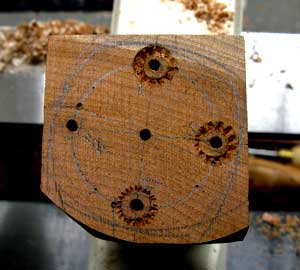
Photo 5
This image shows the guide arcs and the marks on a partly-turned 2 1/2" square cherry blank. The marks from the drive center are visible and clearly illustrate why the diameter of the mounting point circle is limited to 2/3 - 3/4 of the blank width and why the guide arcs are set well beyond the circle.
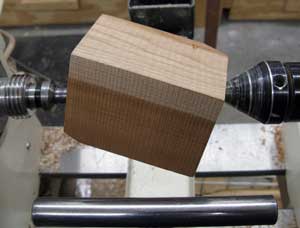
Photo 6
If the blank ends have been marked correctly, turning the twist involves mounting the blank between centers on matching numbered points, i.e., point 1 to point 1, point 2 to point 2, etc. This image of the cherry blank shows what the block looks like when mounted on the right points.
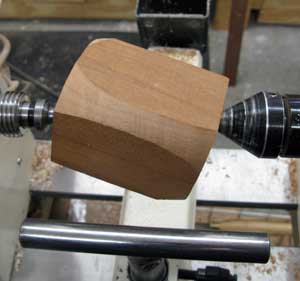
Photo 7
As with the multi-axis finials in the previous articles, I'm going to use the tool rest as a reference, though this time for cutting rather than for alignment. The
mounting points take care of the alignment issue. Since I want teh sides to match as I turn them, I'll use the tool rest as a reference for the shape of the sides.
After making sure the blank clears the tool rest and aligning the tool rest so it's parallel to the gap in the lathe bed, I can start turning. I have a continuously variable speed
lathe, so I set the speed to 0 rpm and turned it up slowly until just below the point where the lathe began vibrating. This speed will vary with the degree to which the blank is
off-balance and with the lathe itself. It didn't take long for the twist to appear once I started cutting.
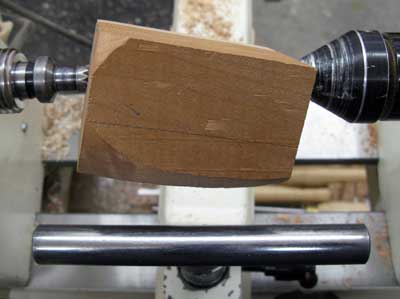
Photo 8
Another photo of the cherry blank, showing the twist as it develops.
In regards to the turning process, the rule of thumb is that cuts should go "downhill" with respect to the direction of the grain to minimize tearout. Deciding which direction is
"downhill" can get a little complicated when turning off-axis, since the direction the grain is oriented can change substantially. So, if my tools are sharp and I'm still
getting more tearout than I think I should cutting in the direction I think is "downhill", I try cutting in the other direction. I've also found that, sometimes, cutting the blank between
the center and the tailstock in one direction and cutting between the center and the headstock in the other direction gives the best results.
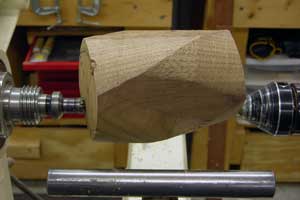
Photo 9
This picture shows the walnut blank turned a bit on all four mounting points. The edges of the twist are becoming well defined, though I've still got more material to remove to complete the turning.
The key is to turn a little bit on one mounting, then move on to the next mounting and
turn a little bit, move on to the third point and turn a bit, move on to the fourth point a turn a bit. Then move the tool rest in a little, still keeping it aligned with
the lathe bed, maybe turn the lathe's speed up a little if you can do it without introducing vibration, and repeat the process, creeping in on the guide arcs marked
on the ends of the blanks.

Photo 10
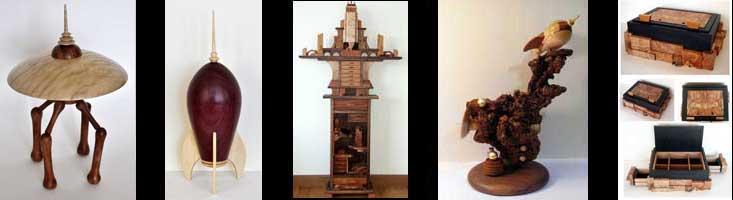
This is the walnut blank, turned to completion and made into a box. Though I won't go into full detail on turning the interior, I will comment on the steps I took.
After the turning is completed and the twist is cut as cleanly as I can get it, I sand the sides by hand using a small, flat block of MDF wrapped with sandpaper. It's important to sand with the grain
and keep the sandpaper from blunting the edges of the twists. I leave the blank on the lathe with the motor OFF, mounted first on point 1, then on point 2, etc., and sand all faces with one grit
before moving on to the next grit.
After sanding the sides, I mounted the blank on the true centers. I cut a tenon about 3/8" - 1/2" long on the bottom of the blank, sized for my chuck's jaws, and cut and sanded the slight round-over to clean up
any torn corner grain or chip-out from the mounting points. The tenon allows me to grip the blank to turn the box cavity in the top. Once I'm done with the cavity, I have enough tenon to slide the box out of the chuck a bit but
still grip the rest securely, and use a thin parting tool to cut the bottom of the box flush. After that, I hand-sanded the flat and bottom to the same level as the sides of the box.